Spacesheep SF Launch Party: Build a BIG 3D Space Sheep
For the Spacesheep San Francisco launch party, we're building this huge 3D Space Sheep as a fun team activity! Pink foam insulation over a plywood box, painted flat like the voxel art. You buy it all at Home Depot, and it takes about two weekends. The lit version adds a flickering flame, glowing eyes and sparks, and an underglow, for one more evening of wiring.
The model: simple boxes on a 1-inch grid
This browser can't draw 3D (WebGL is off). The cut list and steps below have every size.
Drag sideways to turn it.
Plywood carries the weight, foam gives the shape
Skeleton
¾″ plywood deck, front wall and back wall, plus 4×4 legs. Every screw and rod goes into plywood.
Skin
2″ and 1″ XPS foam board. It's light, you cut it with a utility knife, and it sands to crisp voxel edges.
Finish
Spackle the seams, then latex primer, then roll or spray the paint and seal with matte clear coat.
+ one evening for the lights: wiring and phone setup.
Lights: one LED strip, one phone app, four things glow
Flickering flame
The three flame layers are open-backed boxes of tinted, frosted acrylic, with LED strip zig-zagged inside. They run a fire effect.
Underglow
A strip under the deck lights the floor, so the sheep looks like it's hovering on its own exhaust.
Blinking eyes
Frosted acrylic windows with 3 LEDs behind each. They go dark for a moment every few seconds.
Ember sparks
One LED in each frosted cube. The wires run inside brass tubes, which replace the steel rods.
Everything is one chain of 280 LEDs
- 5 V 10 A supplywall plug
- WLED controllerWi-Fi, phone app
- Eyes6 LEDs
- Flame core36
- Flame middle24
- Flame edge15
- Sparks4
- Underglow195
The supply and controller sit inside the hollow body. You reach them through a hatch: the whole flame lifts off the back wall on magnets. Also run a second pair of power wires from the supply to the far end of the underglow, so the last LEDs don't fade brown. In WLED, set the power limit to 8 A.
Shopping list: lights are a third of the billShopping list: paint is 40% of the bill
- Paint & finish $195
- Foam $120
- Wood & screws $95
- Glue, pins & rods $65
- Lights $197
- Paint & finish $173
- Foam $120
- Wood & screws $95
- Glue & pins $51
| Qty | Item | Aisle | ≈ $ |
|---|---|---|---|
| Foam | |||
| 2 | 2″ XPS foam board, 4×8 ftOwens Corning FOAMULAR (pink) or similar. Skip white EPS beadboard, which crumbles. | Insulation | 90 |
| 1 | 1″ XPS foam board, 4×8 ft | Insulation | 30 |
| Wood & screws | |||
| 1 | ¾″ sanded plywood, 4×8 ftAsk the store to make the long cuts so it fits in your car. | Lumber | 60 |
| 1 | 4×4 post, 8 ft (legs use 4 ft) | Lumber | 15 |
| 8 | 5/16″ × 4″ lag screws + washers | Fasteners | 8 |
| 2 boxes | 1¼″ and 3″ wood screws | Fasteners | 12 |
| Glue, pins & rods | |||
| 5 | Loctite PL 300 foamboard adhesive + caulk gun | Paint / adhesives | 30 |
| 1 bag | 1¼″ fender washers (hold foam to plywood with the 3″ screws) | Fasteners | 6 |
| 1 pack | 12″ bamboo skewers (pin foam to foam) | Grocery / kitchen | 4 |
| 1 | ⅜″ × 36″ hardwood dowel (ear pins) | Lumber / moulding | 4 |
| 2 | ¼″ × 36″ plain steel rod (spark rods)Or clear acrylic rod (Amazon) so the sparks look like they float. | Hardware | 14 |
| 1 | 5-minute epoxy | Adhesives | 7 |
| Lights | |||
| 1 | WS2812B LED strip, 5 V, 60 LEDs/m, 5 m | Amazon | 20 |
| 1 | Athom WLED controllerComes with WLED installed, so there's no flashing or code. | Amazon | 25 |
| 1 | 5 V 10 A power supply, barrel plug | Amazon | 20 |
| 3 | ⅛″ transparent tinted acrylic, 12×24: yellow, orange, red | Amazon | 35 |
| 1 | ⅛″ clear acrylic, 11×14 (Optix): eye windows | Home Depot, glass | 10 |
| 1 | Rust-Oleum Frosted Glass spray | Home Depot, spray | 8 |
| 1 | Acrylic cement (Weld-On 4 or SCIGRIP) + plastic scoring knife | Amazon | 15 |
| 4 | 3″ hollow clear acrylic display cubes (sparks) | Amazon | 15 |
| 2 | ¼″ × 36″ brass tube (spark stems with wires inside) | Amazon / hobby shop | 12 |
| 1 kit | 3-pin JST SM plugs, 22 AWG 3-core wire, Wago lever nuts | Amazon | 15 |
| 1 | ½″ plywood, 2×2 ft project panel (flame hatch) | Home Depot, lumber | 12 |
| 8 | Neodymium disc magnets + steel washers | Home Depot, hardware | 10 |
| opt. | HC-SR501 motion sensor (the sheep "fires up" when someone walks up) | Amazon | 5 |
| Paint & finish | |||
| 1 gal | KILZ 2 water-based primer (safe on foam) | Paint | 30 |
| 2 qt | Matte latex, warm white + charcoalTinted at the paint desk to the swatches below. | Paint desk | 44 |
| 8 | Spray cans for small parts (see colours) | Spray paint | 60 |
| 5 | Spray cans for small parts (the flame is tinted acrylic) | Spray paint | 38 |
| 2 | Matte clear coat spray | Spray paint | 16 |
| 1 qt | DAP Fast 'N Final lightweight spackling | Paint | 12 |
| 2 | FrogTape, 1.41″ (for the checker grid) | Paint | 16 |
| 1 | 4″ foam roller kit + brushes | Paint | 12 |
| 4 | Felt furniture pads (feet) | Hardware | 5 |
| Total | ≈ 475 | ||
| Total (without the motion sensor) | ≈ 640 | ||
Tools: utility knife + snap-off blades, 48″ drywall T-square, drill/driver with ¼″, 3/16″ and ⅜″ bits and a ½″ socket, caulk gun, 120/220 sanding block, tape measure, dust mask. Nice extra: a hot-wire foam cutter (Amazon). For the lights: a small soldering iron helps, but lever nuts and JST plugs get you there without one.
Nine flat colours: roll the big ones, spray the small ones
#E8E3DA#CFC9BC#3D3D44#2C2C31#BDBDC2#D4717F#F2C21B#EE8914#D9432CNever spray bare foam. Give every foam surface two coats of KILZ 2 primer first, and test your cans on a scrap. Rust-Oleum Painter's Touch 2X comes in all of these colours. Hold each swatch on your phone against the can caps in the store. Seal everything with matte clear so the gloss cans don't shine.
Cut list: 4 plywood panels, 47 foam pieces
| Piece | Inches | cm | Qty |
|---|---|---|---|
| ¾″ plywood — one sheet | |||
| Deck (body floor) | 42 × 30 | 107 × 76 | 1 |
| Body front + back walls | 26 × 25¼ | 66 × 64 | 2 |
| Head back plate | 24 × 20 | 61 × 51 | 1 |
| 4×4 post | |||
| Leg posts | 12 long | 30.5 | 4 |
| 2″ foam — two sheets | |||
| Body sides | 42 × 25¼ | 107 × 64 | 2 |
| Body top | 42 × 30 | 107 × 76 | 1 |
| Top tuft | 32 × 22 | 81 × 56 | 1 |
| Head sides | 15¼ × 20 | 39 × 51 | 2 |
| Head top + bottom | 15¼ × 20 | 39 × 51 | 2 |
| Head front | 20 × 16 | 51 × 41 | 1 |
| Snout (two layers stacked) | 12 × 8 | 30 × 20 | 2 |
| Head side bumps | 5 × 4 | 13 × 10 | 2 |
| Flame: yellow / orange / red | 20×16 · 14×12 · 8×8 | 51×41 · 36×30 · 20×20 | 1 each |
| Ear cores | 3 × 8 | 8 × 20 | 2 |
| Spark cores | 3 × 3 | 8 × 8 | 4 |
| 1″ foam — one sheet | |||
| Checker panels | 28 × 20 | 71 × 51 | 2 |
| Face plate | 18 × 16 | 46 × 41 | 1 |
| Leg wraps, narrow / wide | 3½ × 12 · 5½ × 12 | 9 × 30 · 14 × 30 | 8 + 8 |
| Ear + spark skins (glued to the 2″ cores → 3″ thick) | 3 × 8 · 3 × 3 | 8 × 20 · 8 × 8 | 2 + 4 |
| Ear skins (glued to the 2″ cores → 3″ thick) | 3 × 8 | 8 × 20 | 2 |
| Lights: acrylic + ½″ plywood | |||
| Flame box fronts, tinted acrylic (each box gets four 2″ sides too, open back) | 20×16 · 14×12 · 8×8 | 51×41 · 36×30 · 20×20 | 1 each |
| Eye windows, clear acrylic | 3½ × 3½ | 9 × 9 | 2 |
| Flame hatch plate, ½″ plywood | 20 × 16 | 51 × 41 | 1 |
| Hatch opening cut out of the back wall | 12 × 10 | 30 × 25 | 1 |
Assembly: structure first, paint, then details
Cut every piece
Foam: score twice along the T-square with a fresh blade, snap it over a table edge, then sand the edge flat. Write the name on each piece in pencil.
Base: deck + legs
Mark the post centres 4¾″ in from the front and back of the deck and 4¼″ in from the sides. Drill 5/16″ holes through the deck and 3/16″ pilots into the posts, then drive 2 lag screws into each post. Flip it over and check it doesn't rock.
Holes for the lights, before the box closes
You can't reach inside once the top is on, so cut these now.
- Hatch: cut a 12 × 10″ opening in the back wall, centred side to side, with its centre 13¼″ up from the wall's bottom edge. The flame module covers it.
- Cord: drill a ¾″ hole through the deck, next to a back leg, for the power cord and the underglow wires.
- Eye wires: drill a ¾″ hole through the front wall, centred, 14″ up from the deck top.
Body shell: the big box
Six panels make a hollow box. Three are plywood (floor, front, back) and three are 2″ foam (two sides, top). The plywood walls carry the head and the spark rods and the flame hatch; the hollow keeps it light and holds the electronics.
- Front wall: stand it on the deck, flush with the front edge, leaving 2″ empty at each side for the foam. Drill pilots, then drive 3″ screws up through the underside of the deck into the wall, every 6″.
- Back wall: same, flush with the back edge. Clamp a scrap board across the tops of both walls to keep them square.
- Foam sides: run PL 300 along the deck edge and both wall ends. Press each 42 × 25¼″ side on so it sits on the deck and covers the wall ends. Pin it with 3″ screws through fender washers into the plywood, 3 per wall end.
- Foam top: take the clamp board off. Glue the tops of all four walls, lay the 42 × 30″ top on, screw it into the plywood tops with washers, and weigh it down with paint cans.
- Cure: tape the corners and leave it 24 h.
Head box
Glue and screw the head plate to the front wall with 6 × 1¼″ screws, centred, with its bottom edge 3¼″ above the deck top. Glue the sides, bottom and top to the plate, then the front last. Glue the bumps onto the head sides, 2″ below the top and 6″ from the back.
Before the head plate goes on, drill a ¾″ hole through it to match the eye-wire hole in the front wall.
Fill, sand, prime
Spackle the seams and screw heads, then sand them flush with 220 grit. Keep every edge sharp: it's voxel art, so round nothing. Give all foam two coats of primer, including the loose detail pieces.
Paint
Roll the body fleece colour and the head and legs charcoal, 2 coats each. Paint the details while they're still loose. For each checker panel, paint it all fleece, tape a 4″ grid and fill alternating squares with the shade. Mask 3½″ squares for the eyes.
Top tuft + checker panels
Glue the tuft 4″ in from the back and the sides. Glue each checker panel 4″ from the back and 3″ above the bottom edge. Pin each piece with 4 skewers.
Face
Glue the face plate centred, 2″ above the head's bottom edge. Laminate the two snout layers, then glue the snout centred with its bottom 1″ above the head's bottom. Paint a 3 × 3½″ pink tongue on the lower middle of the snout.
Glowing eyes: before gluing the face plate on, cut two 3½″ square windows through the face plate and the head front: 2″ either side of centre, top edges 5½″ below the head top. Frost the acrylic squares and glue them flush into the face plate. Stick a 3-LED piece of strip 1″ behind each window, and run the wire through the head plate hole into the body.
Ears
Drill ⅜″ holes 3″ deep into each ear and into the head top, 4″ from the head's back edge and 5″ either side of centre. Glue in 6″ dowels.
Rocket flame
Stack yellow, then orange, then red, each centred on the one before. Put the yellow plate's bottom 6″ above the body's bottom edge.
Sparks
Push each rod through the flame into a ½″-deep hole in the plywood back wall and epoxy it. Push a spark cube 1½″ onto the end with a dab of epoxy.
- Rod lengths: 16″, 13″, 19″, 17″
- Stagger the heights between 20″ and 33″ off the floor
Flame module (it's also the hatch)
Score and snap the tinted acrylic. Glue each colour into an open-backed box, 2″ deep, with acrylic cement, then frost the outside. Each box is lit from inside:
- Zig-zag strip across the ½″ hatch plate: 36 LEDs in the yellow area, 24 in orange, 15 in red.
- Glue yellow, orange and red boxes on in a stack, each centred on the one below. Hot glue holds acrylic to plywood well.
- Screw 4 steel washers to the back wall around the opening and glue 4 magnets to the plate so they meet. Put a JST plug on the wires so the hatch unplugs.
Glowing sparks
Epoxy the brass tubes into the hatch plate so they stick out through the flame boxes. Run 3 thin wires through each tube to one LED glued inside a frosted, tinted cube, then slide the cube 1½″ onto the tube.
- Tube lengths: 14½″, 11½″, 17½″, 15½″
- Stagger the heights between 20″ and 33″ off the floor
Underglow and wiring
Stick the underglow strip under the deck, 2″ in from the edge and around the legs, using its tape plus a clip every foot. Put the supply and controller on the deck inside, through the hatch. Wire one chain in this order: eyes, flame, sparks, underglow. Add the second power feed to the underglow's far end.
Set up WLED on your phone
Join the controller's own Wi-Fi, then open the WLED app.
- Set the LED count to 280 and the power limit to 8 A.
- Make segments: eyes 0–5, flame 6–80, sparks 81–84, underglow 85–279.
- Effects: Fire 2012 on the flame, Candle on the sparks, Breathe in amber on the underglow. For the eyes, use white with the Blink effect at a slow speed.
- Save it all as a preset called "Launch" and set it to start at power-on. Optional: wire the motion sensor to a spare pin and set it as a button that runs "Launch" at full brightness.
Seal and finish
3-Person Team Effort & Time Estimate
With 3 people working in parallel, the total build time drops from two weekends down to roughly a single solid weekend (12–14 total working hours) plus glue/primer drying downtime.
- Person 1 (Carpenter / Skeleton): Cuts plywood, builds base & body box, handles structural mounting and rod drill holes.
- Person 2 (Sculptor / Skin): Slices XPS foam slabs, carves head/face bevels, and dry-fits foam outer panels.
- Person 3 (Finishing & Electronics): Solders/wires WLED strips and acrylic flame boxes, then leads spackling, priming, and painting.
Schedule breakdown: Saturday morning (4 h) for parallel cut + skeleton build; Saturday afternoon (3 h) skin glue-up & curing overnight. Sunday morning (3 h) fill, sand, prime & roll paint; Sunday afternoon (3 h) wiring install, detail attachment, and final reveal.
Spray two coats of matte clear on the painted parts only, keeping it off the acrylic, then stick felt pads on the feet.
Alternative plan: the 3-hour glowing sheep
Build a plain cardboard sheep and let light and fog do the showing off: a glowing rocket flame with fog exhaust, an underglow that makes it hover, and eyes that light up. Nothing gets painted, wired or soldered. It's an indoor party prop, not a sculpture that lasts.
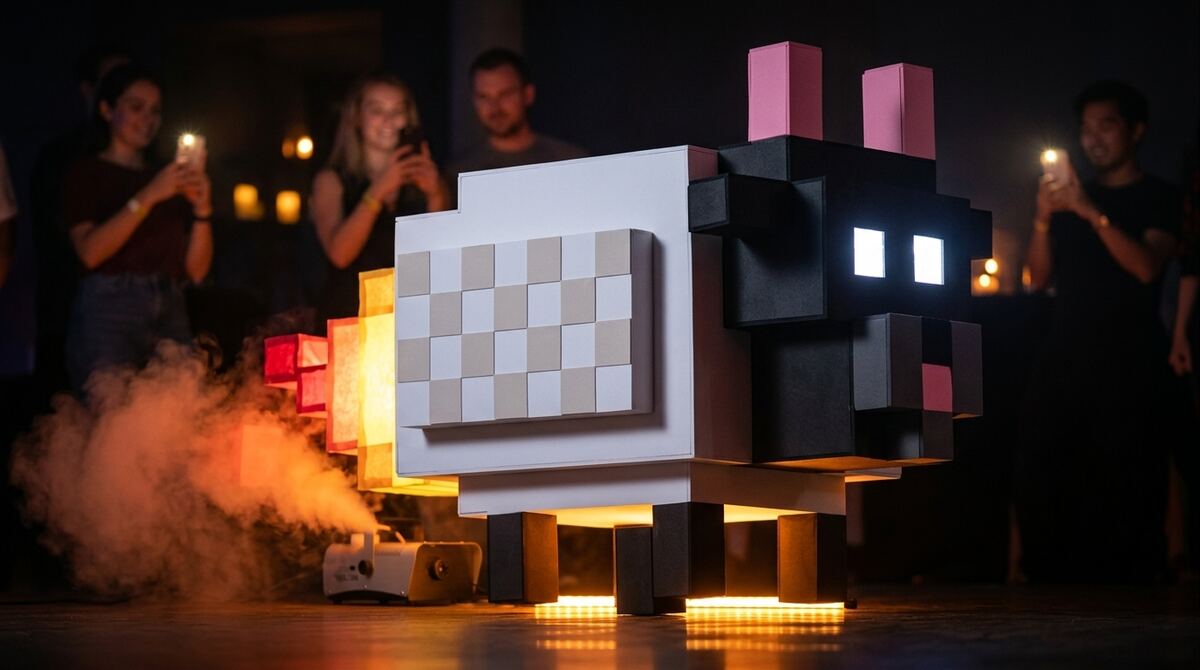
Light and fog give the wow, for about an hour of the work
| Effect | Effort | How |
|---|---|---|
| Rocket exhaust | ~10 min | Small fog machine on the floor behind the flame. The flame lights the fog orange. |
| Glowing flame | ~30 min | 3 cardboard frames with the fronts cut out, covered in yellow, orange and red tissue paper. An LED strip inside, set to a flicker mode. |
| Hovering | ~10 min | An LED strip with a remote under the body, running off a power bank |
| Glowing eyes | ~10 min | Eye holes covered in white tissue paper, with a puck light behind each |
| Size | free | Use the biggest boxes you can get. A bigger sheep takes no extra steps. |
What gets cut
| Part | Full build | 3-hour build |
|---|---|---|
| Frame | Plywood, 4×4 legs, lag screws | Moving boxes + packing tape |
| Skin | XPS foam + PL 300 (24 h cure) | Foam board + hot glue, only on the sides guests see |
| Colour | Primer, 9 paints, clear coat | Pre-coloured board + tissue paper |
| Checker, sparks | Taped grid, rods and cubes | Skipped: lost in the dark anyway |
| Lights | 280-LED WLED rig, wiring | 2 USB LED strips + 2 puck lights |
| Exhaust | None | Fog machine |
| Sizing | Cut list to the ¼″ | Whatever the boxes give you |
Who does what
| Time | Person 1 · Body | Person 2 · Head | Person 3 · Flame |
|---|---|---|---|
| 0:00–0:45 | Tape boxes into the body, an X of cardboard walls inside; bin under the middle; small boxes as legs | Head box in black board, snout, pink ears; cut the eye holes | 3 flame frames, tissue fronts, strip inside |
| 0:45–1:30 | White board on the sides guests see; top tuft | Eye lights in; glue the head on the front | Underglow strip under the body; flame on the back |
| 1:30–2:00 | Everyone: room lights off, fog on, test it, fix whatever shows | ||
| 2:00–3:00 | Buffer: move it into place, set the lights, take photos | ||
Step by step
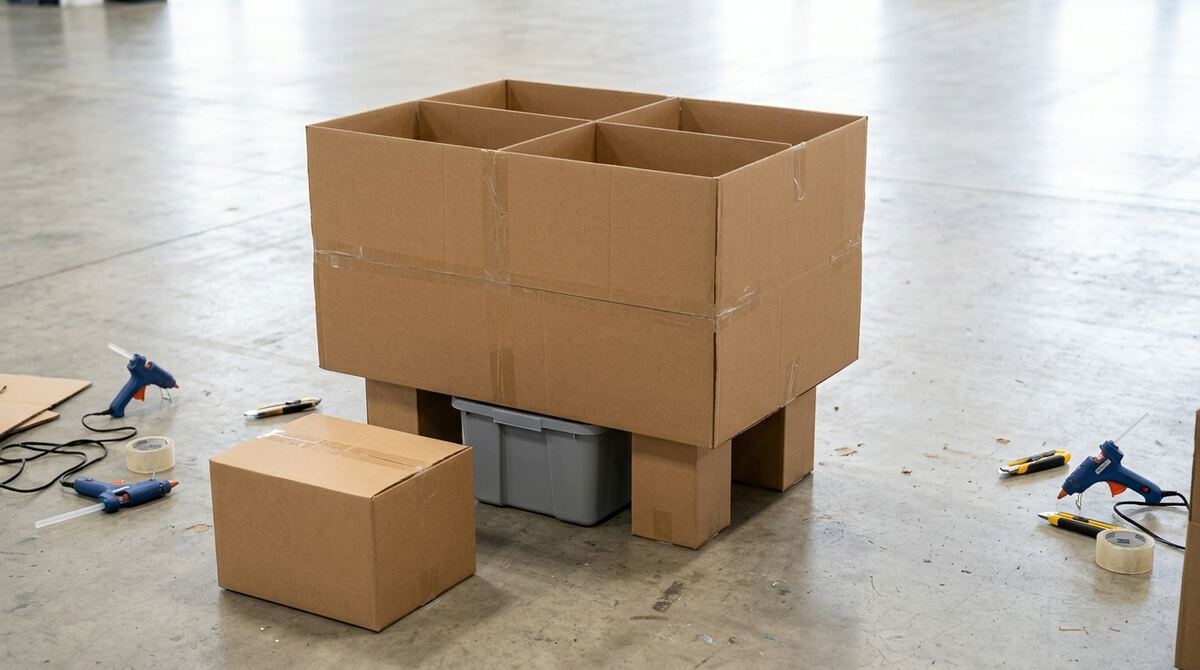
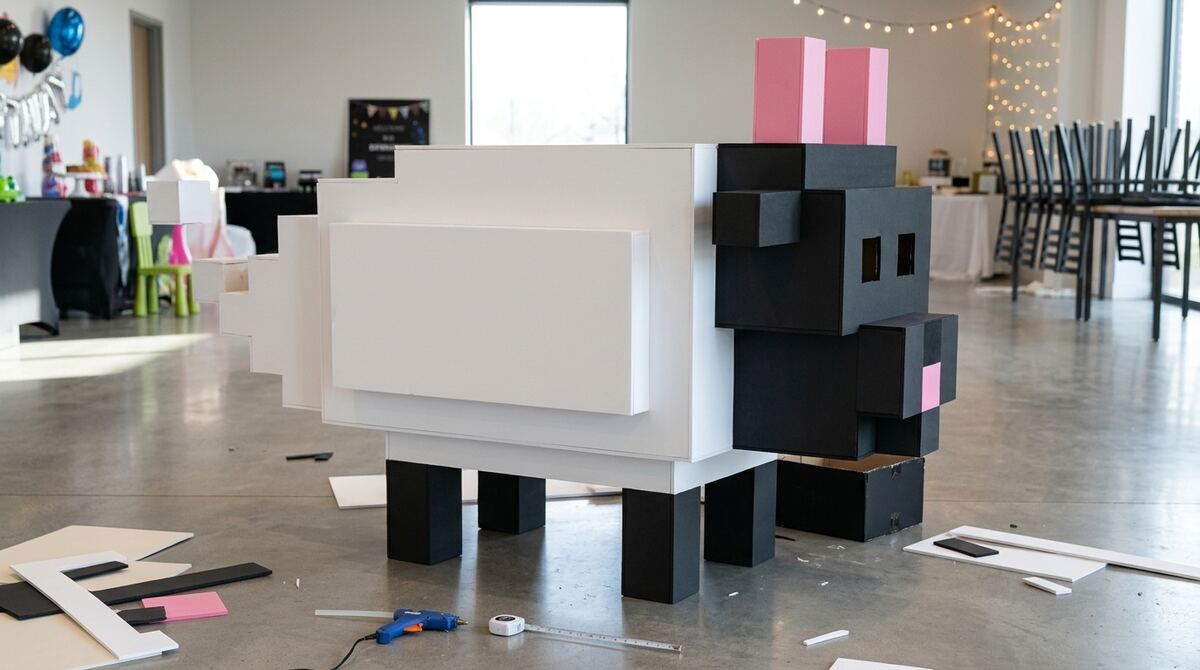
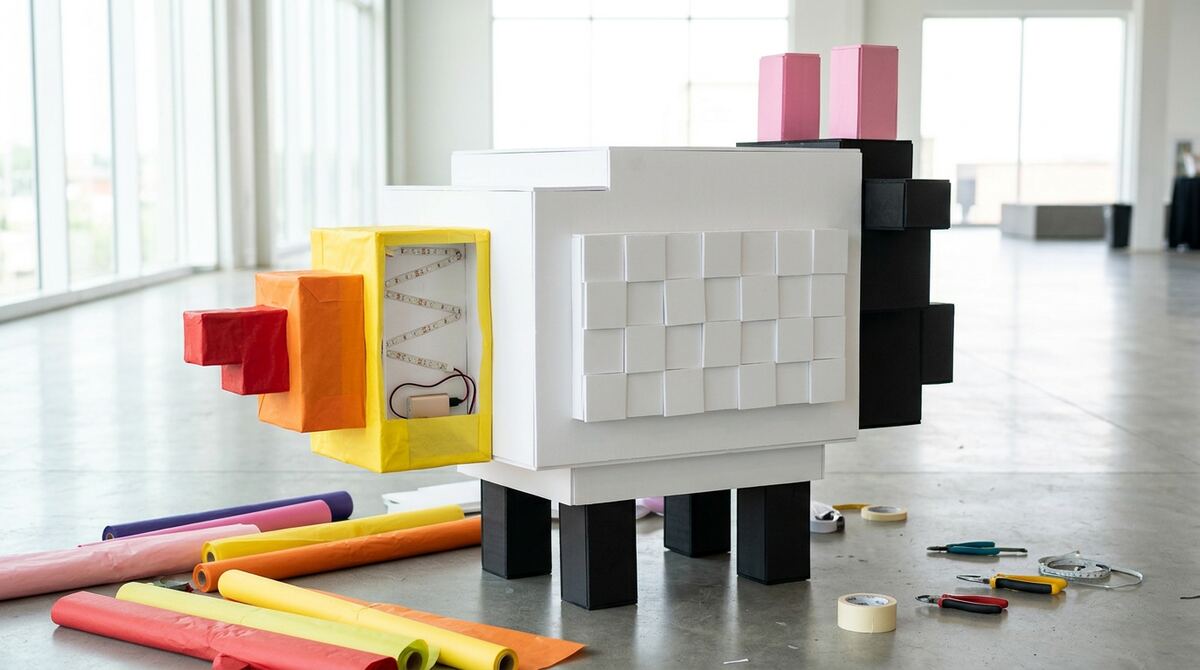
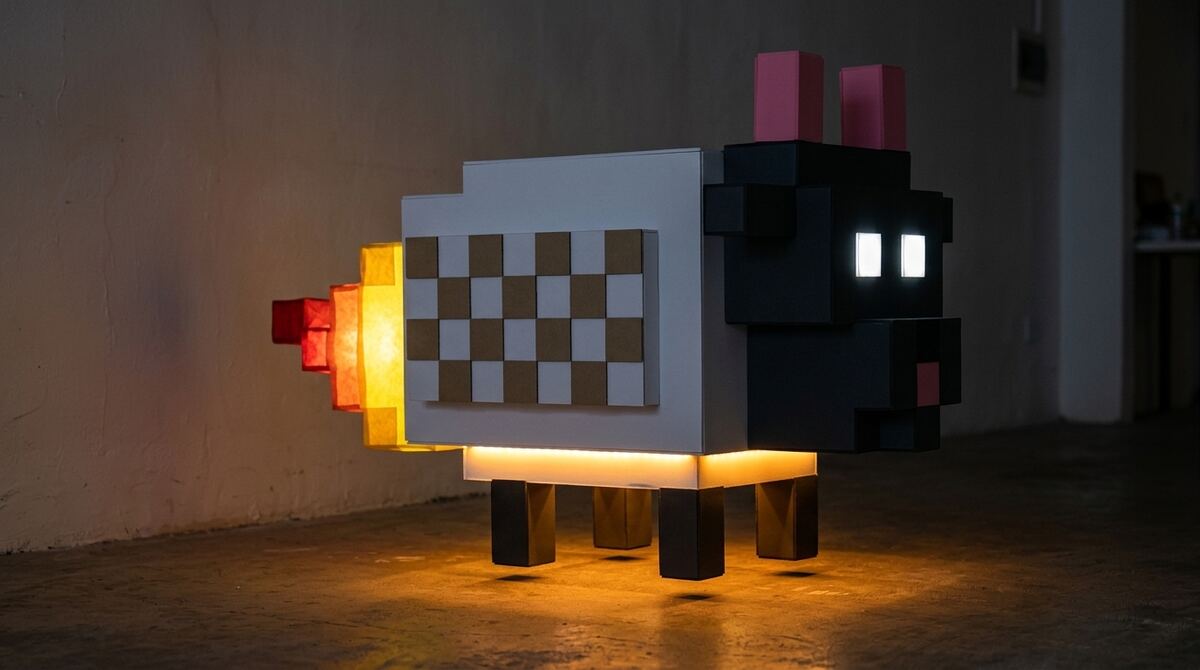
AI-generated previews based on the sheep artwork. The checker panels in the lit photos are optional.
Shopping list (the day before)
- Moving boxes: 2–3 large (body), 1 medium (head), 5 small (legs, snout)
- Foam board, 20×30″: about 6 white, 3 black; pink poster board
- Tissue paper: yellow, orange, red, white
- 2 USB LED strips with a remote and flicker modes, plus 2 USB power banks
- 2 battery LED puck lights
- Small fog machine + fog fluid (Halloween aisles usually stock them in October)
- 3 low-temp hot glue guns and sticks, 3 box cutters, packing tape
Match the proportions by eye: the body about 1.5× as long as it is tall, and the head about half the body's height. Put it against a wall in the darkest corner of the room, so you can skip the hidden side and the lights carry the show.
Safety: use LED lights only, and keep the fog machine's nozzle away from cardboard and tissue, because it gets hot. Ask the venue before you run fog, since some smoke alarms go off from it.
Notes and assumptions
Sizes come from the original artwork and are rounded to a 1″ grid, so foam thicknesses line up. Prices are rough 2026 US Home Depot shelf prices. The ¾″ plywood nests on one sheet: the deck, two walls side by side along its length, and the head plate beside them. The 2″ foam nests on two sheets: body sides and top on one, everything else on the second. Want it bigger? Scale every size by 1.25 for a 140 cm sheep and buy about 1.5× the foam.